


Introduction
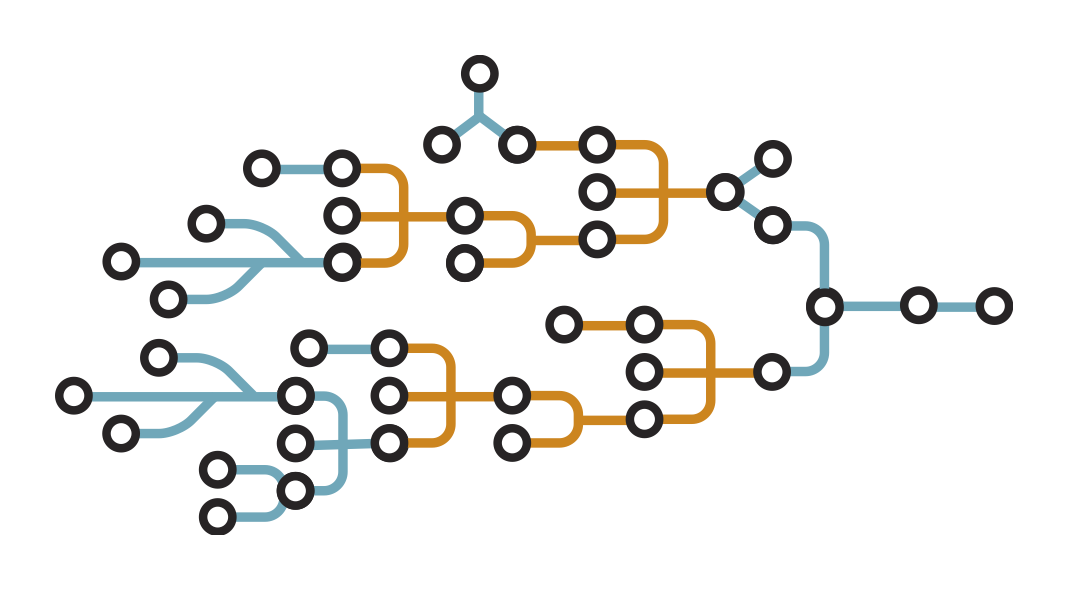
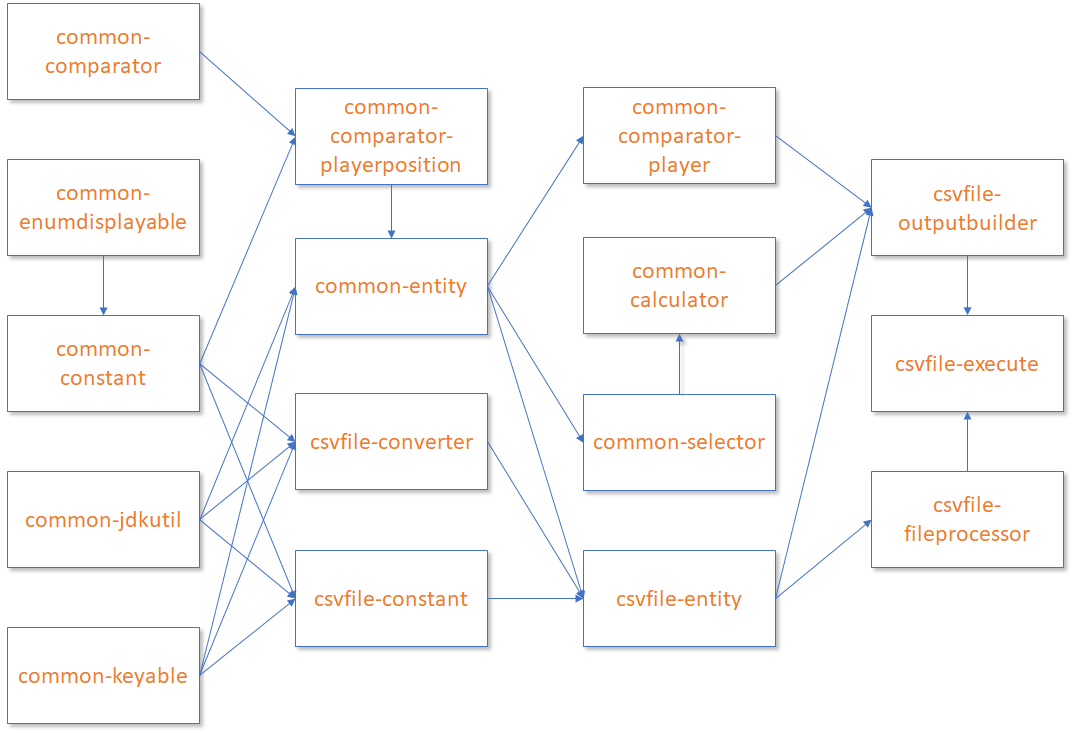
Last month we looked into some best practices relating to Dockerfiles and we touched on how BuildKit can improve upon that. As a continuation of those discussions, we are going to look into a specific example of where BuildKit can really help improve a build. For this example, we are going to take a look at an old Java project that I wrote years ago. The goal of the build is to create an image that can run the web application. In order to do that, we need to build 16 jars that are also part of this same project. Some of the jars have dependencies on the others; therefore, there is an order in which things must be built but also a chance to build them concurrently. Here is an image that shows the dependencies/build order.
Let’s take a look at how we build this today, how we can containerize it and then how we can use BuildKit to optimize it.
Pre-Docker
Let's start by taking a look at how the application gets built today without Docker. Then we can look for places that Docker can help with the build.
Local Builds
Locally, I use a script to call all of my Gradle builds and copy their artifacts to a common directory so that other builds can reference them. The good news is that the script ensures that everything gets built and that it all gets built in the proper order. The bad news is that the script ensures that everything gets built EVERY time I execute the script. Essentially, I'm trading speed to ensure I have a repeatable process.
CI Builds
I could have used the script for my CI Builds, but Jenkins allows me to run jobs in parallel out of the box. For CI, I ditch the script and configure my Jenkinsfile to do the same thing my script was doing, but with the added bonus of running the builds concurrently. On the plus side, my builds run a bit faster on the CI box and my build stages still run in a predetermined order.
On the down side, I still have to rebuild everything each time the build triggers. Additionally, concurrency is handled differently by the various CI tools (how jobs are scheduled/run, how artifacts are carried forward between jobs, etc). I have a way that works with Jenkins, but I will need to rework that if I switch to another tool like Gitlab CI.
Parts that can be Improved
For starters, I have two different builds to maintain and that violates the DRY principal. On top of that, any tools that I need for the build (JDK, Groovy, Gradle, etc) are being installed in multiple spots. This can lead to different versions being used between my local machine and my CI server. Finally, every change requires a full rebuild.
Thankfully, all three of those are quick fixes with a switch to Docker.
Containerizing the Application
At this point, I know I am switching to Docker and I know some pain points that I want to target. I don't know exactly how I'm going to get there, but there are a couple of options that I can rule out right away.
- Building with "docker run" commands - One of my pain points is that I rebuild too much. Any change triggers a full rebuild of the 16 jars. docker run is not going to help with that because it doesn't have the built-in caching that docker build does. Since I don't want to build my own caching/tracking logic, I'm going to go with docker build.
- Combining my build and runtime - I can build and run my application from a single image, but that violates best practices. My final image would be bigger than it needs to be, it would contain my source code, build tools and a JDK. I could try to clean it up, but I'm better off going with a multi-stage build and just leaving all of the build specific pieces behind.
- Using my build script within the build - docker build will give me access to the build cache, but using my build script basically makes the cache useless. It makes my Dockerfile look simpler, but the extra lines that it saves me from writing are actually extra layers that I could be caching.
FROM gradle-base AS builderRUN mkdir /home/gradle/projectWORKDIR /home/gradle/projectCOPY --chown=gradle:gradle . .RUN ./build.sh
FROM jboss/wildfly:17.0.1.FinalCOPY --from=builder \/home/gradle/project/com.demo.web/build/libs/com.demo.web.war \/opt/jboss/wildfly/standalone/deployments/
Basically, hiding all of the steps behind the script makes the file look neater, but now all of my build steps are cached in the same layer. Any change invalidates that layer and triggers a full rebuild. The contents of the script are useful, but the script itself isn't.
Based on the things I want to avoid, the best option going forward is a multi-stage build. The only question is; how many stages?
Two Stages
This is the most common setup when it comes to multi-stage builds. The first stage does all of the building and the second stage is setup to execute the runtime. The only thing that I need to do is copy my artifacts from the build stage to the runtime stage. In this case, I can just take the contents of the build script and add it to my Dockerfile as the build stage. Then I just need to copy my war file into my runtime image and I am done.
Now I get to utilize the build cache from Docker and I can skip any layers that do not require changes. The main downside to this is the lack of concurrency and the fact that I still do some additional builds. The reason for the additional builds is because I have to order the build steps into layers. Once a layer changes then every step below that needs to be rerun. In this case, a change to common-comparator will trigger a full rebuild since it is at the top of my Dockerfile. So even though common-enumdisplayable doesn't have a dependency on common-comparator, it still needs to rebuild because it's in a layer below common-comparator.
A Stage Per Artifact
On the other end of the spectrum I can go with a build per artifact. In this case, I am going to end up with 19 stages (16 jar builds, 1 war build, 1 common Gradle setup & 1 runtime).
I gain a couple of benefits from going with more build stages. The first is that I can better utilize the build cache and only rebuild jars when necessary. This is because docker build is smart enough to skip rebuilding images that are not impacted by the change.
Additionally, I have the option to break these stages into separate Dockerfiles and build them concurrently, similar to how I was building the jars on my CI machine. That comes with some additional work. Since I have to ensure that all of my build machines have the latest version of the images and the build caches.
However, there is also an issue with breaking up my build this way. Right now, each stage/image is going to be responsible for pulling their own copy of the 3rd party dependencies. That means I am now going to be pulling libraries like Guava and Spock 16 times each. There are ways to work around this though. I could either add the dependencies to a common image/stage or I could even copy them forward from one image/stage to the next. Both of these feel a bit like a hack though. So for now, I'm just going to live with the re-downloading.
Decisions
At this point, I have to decide how many stages I want to build. The only real benefit of the two-stage build is that my Dockerfile is smaller and my 3rd party dependencies are not downloaded as often. The nineteen-stage build is more complex and requires a much larger file, but that complexity/size lets me better utilize the build cache. On top of that, I could work around the dependency caching issue and I also have the option to break the stages out into their own files for build concurrency with the nineteen-stage build. However, I'm not too excited about my potential solutions for either of these problems. Luckily, if I enable BuildKit I can solve these problems in a much cleaner method.
Optimizing with BuildKit
The first thing I have to do is just to enable BuildKit. There are a couple of ways to turn it on. For my tests, I'm just going to enable per build. Just enabling BuildKit allows me to run my build stages concurrently. So, I just resolved one of my major remaining issues by enabling BuildKit.
Cache Mount
The last issue that I have to solve is the caching of my 3rd party dependencies. I have some workarounds, but there is a much more elegant solution available with BuildKit. BuildKit introduces numerous different mount options that can be used during the build phase, similar to mounts that can be used at run-time. One of these mounts type is a cache that works great for caching dependencies like this.
Since this syntax is experimental, I have to add a line to the top of my Dockerfile to enable it (you need to do this along with enabling BuildKit).
The next thing I have to do use the cache. To do this, I need to add the mount to my RUN commands where I execute the Gradle builds.
Now I solved my last issue. All of my stages are using the same cache and I no longer have to download 16 copies of my 3rd party dependencies. After this I have:
- a single build that I can use locally and on my build server
- a build that runs concurrently
- a build that does not require a full rebuild for every file change
- a build that does not require me to install any additional tools, other than Docker
Conclusion
I've gone through all this work and talked about some benefits but I haven't shown anything tangible. The last thing to do is a take a look at how the long the builds took and see what kind of impact the changes had on those timings. I ran each build a couple of times to see how it performed in a few different scenarios.
- First Time Build - This is the first time I run the build (excluding downloading the base images) on the given machine. This is always going to be full build.
- Skip the Build - For this scenario, I changed a file (in this case the Readme.md) that has no impact on my final artifact and kicked off the build again. My preference would be to skip the build in this situation since nothing of importance (as far as my runtime goes) really changed.
- Change the First Artifact - Here I am changing the artifact at the top of the script (in my case this it is the common-comparator jar). My preference would be that this change only rebuilds this jar and any other artifacts that are dependent on it.
- Change the Last Artifact - For the final test, I modified the html that gets pulled into my war file. Since this is the final artifact to be built, my preference is that it should be the only artifact to be built.
| Build Type | Scenario 1 | Scenario 2 | Scenario 3 | Scneario 4 |
| build.sh | ~230 | ~215 | ~215 | ~215 |
| 2 Stages | ~240 | ~5 | ~240 | ~20 |
| 19 Stages | ~315 | ~5 | ~210 | ~25 |
| BuildKit | ~235 | ~5 | ~155 | ~25 |
| Mount | ~155 | ~5 | ~105 | ~15 |
My build script took just under 3 minutes to run on average. It got a little quicker once it had already run and pulled down my 3rd party dependencies, but it always required a full rebuild and could not be multi-threaded (without more work on my end).
Running the build using just two-stages was slightly slower than using the build script when I had to trigger a full rebuild, but much faster than the nineteen-stage build (at least for the first build). It had the advantage of being able to use the build cache, which makes it faster for most of my changes. However, it still rebuilt more than it needed to do.
The nineteen-stage build was the slowest to start with but got faster after that because it never had to do a full rebuild. This is because docker build is smart enough to know to skip rebuilding stages that were not impacted by the code changes. The biggest gains with this type of build came into place when I switched to BuildKit. Enabling BuildKit gave me the ability to run some of those stages concurrently, which improved the speed of the build. Using a cache mount took resolved my last pain point, which was the constant re-downloading of 3rd party dependencies, and made my build much faster.
Overall, going with more build stages and switching to Docker BuildKit allowed me to better utilize Docker's build cache while also solving several of my pain points (without resorting to hacky solutions).