


©2018 Paul Knell, NVISIA LLC
Terraform is a tool that allows you to provision cloud resources (e.g., server instances, auto-scaling groups, networks, roles/permissions, etc.) by declaring them in configuration files. These files can then be versioned, reviewed, and executed to update your various deployment environments (e.g., UAT, Staging, Production). There is an open-source version that is free to use, and also an enterprise version that adds features such as delegation of infrastructure management across multiple teams. This article presents a technique for using the open-source Terraform edition in conjunction with AWS and GitLab’s CI/CD Pipelines—in order to automate the use of Terraform at a very low cost (e.g., GitLab pricing starts at $0/month). This technique provides a number of benefits over manual configuration of infrastructure:
- Consistency across environments
- Easier to promote changes to higher environments with less potential for human error
- A record (in GitLab Pipelines) of all Terraform executions
- Version-controlled configuration of cloud resources
- Potential to utilize other Cloud vendors without tools/process changes (i.e., Terraform supports all major Cloud vendors)
- Ability to review infrastructure changes before they are applied
- EC2 Instance Profile on the “GitLab Runner” instance eliminates the need to locally store AWS credentials
Typically, when you start using Terraform, you begin at the local command line by writing configuration files and then running them with "terraform apply" commands. It doesn't take long, though, before you realize that just using the local backend (the "terraform.tfstate" file) isn't enough for collaborative projects where the state needs to be shared and the deployment pipelines can run concurrently. Therefore, the S3 Backend should be used. This backend uses a DynamoDB table as a locking mechanism to serialize concurrent executions. The use of S3 to store the Terraform state is simple when there's just one environment, but when you need to support multiple (e.g., UAT, Staging, Production) there's a bit more to it... you can either:
- Use a single S3 Bucket with different folders for the various environments by using Terraform's workspace feature.
- Or, use a separate S3 Bucket for each environment.
We like to use different AWS accounts for each environment, particularly because it isolates them and helps distinguish costs on the monthy bill. For this article, we'll use the second approach--each account (i.e., each environment) gets it's own "Terraform State" S3 Bucket.
For the CI/CD server, however, there's only one for all environments--to keep costs down.
If you work through this entire article, you'll end up with a working example pipeline that deploys an EC2 instance into multiple environments, as depicted below:
A few notable items about the above diagram:
- The GitLab Server can either be self-managed by deploying your own instance into the DevOps Account (right next to the GitLab Runner), or the GitLab Runner can be configured to point at "gitlab.com". It's more leg-work to run your own, but there are advantages. For this article, we'll simply use gitlab.com
- The updates that Terraform performs against each environment can be either: automatic (upon code commit), periodically scheduled, or push-button (i.e., manual review/approval)--it all depends on how you configure the GitLab Pipeline.
- Only "Staging" and "Production" are depicted, but it's easy to add more environments.
Getting Started
You're going to need a GitLab account, and at least two AWS accounts (or three if you want to set up both "staging" and "production"). To facilitate some of the set-up of the AWS accounts, this article references a couple CloudFormation templates, but provides explanations around how these templates work.
Create New GitLab Project
In the GitLab account, create a new blank project:
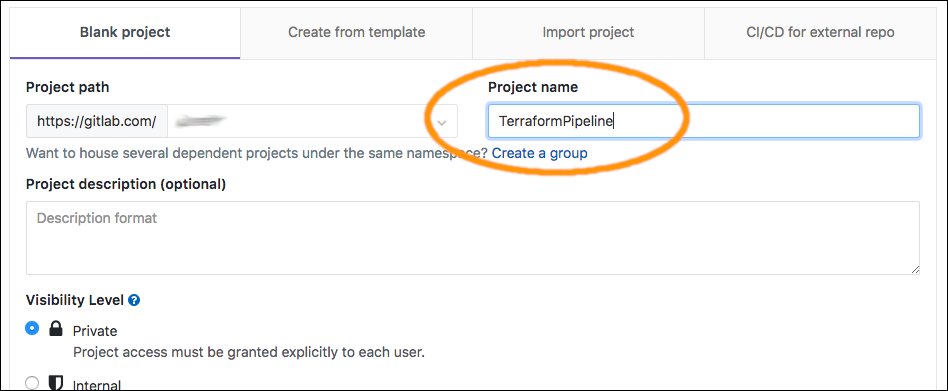
This will be the project for the CI/CD Pipeline. Initially, you can create it with just a README.md file, but later we'll add a ".gitlab-ci.yml" and a "main.tf" file.
Go to the project's settings, "Settings --> CD/CD --> Runners", click the "Disable Shared Runners" button (because we'll be using our own runner), and copy the registration token (for use later): 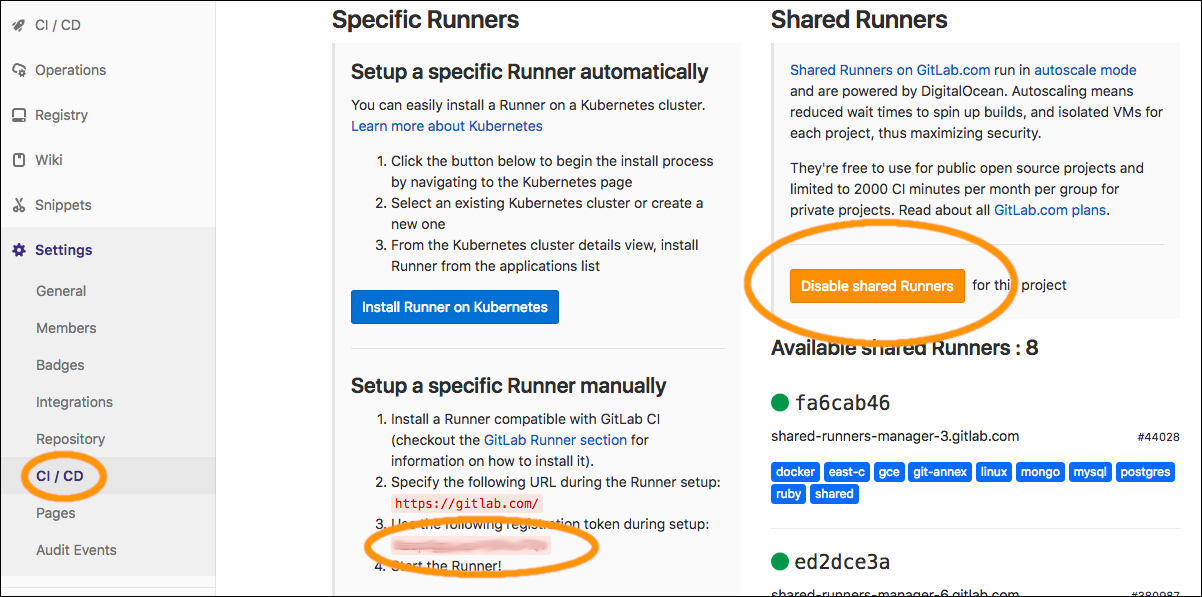
Create Each AWS Account and IAM User
You'll need 2 or 3 AWS accounts. You can create them, or use existing ones. Throughout this article, I'll refer to the first account as "DevOps", the second as "Staging", and the third (if you're using three) as "Production".
In each AWS account, if you're following the recommended practice of using an IAM user (rather than the root account credentials), make sure your user has console access and sufficient permissions. If you use the "Administrators" group, that's the easiest way to get going.
Otherwise, you can use the IAM console to create custom groups/policies:
- For the DevOps account, you'll need administrative access to: IAM, CloudFormation, S3, SNS, Lambda, AutoScaling, and EC2
- For the Staging and Production accounts, you'll need administrative access to: IAM, CloudFormation, S3, SNS, DynamoDB
Disclaimer: You're responsible for AWS costs in your accounts--but I have designed this article to stay within the "Free Tier" because it only creates one t2.micro EC2 instance in each account. Please remember to clean-up when you're done by deleting the CloudFormation stacks and terminating EC2 instance(s) in each account. Therefore, it shouldn't cost much if the accounts are otherwise unused.
Deploy the GitLab Runner
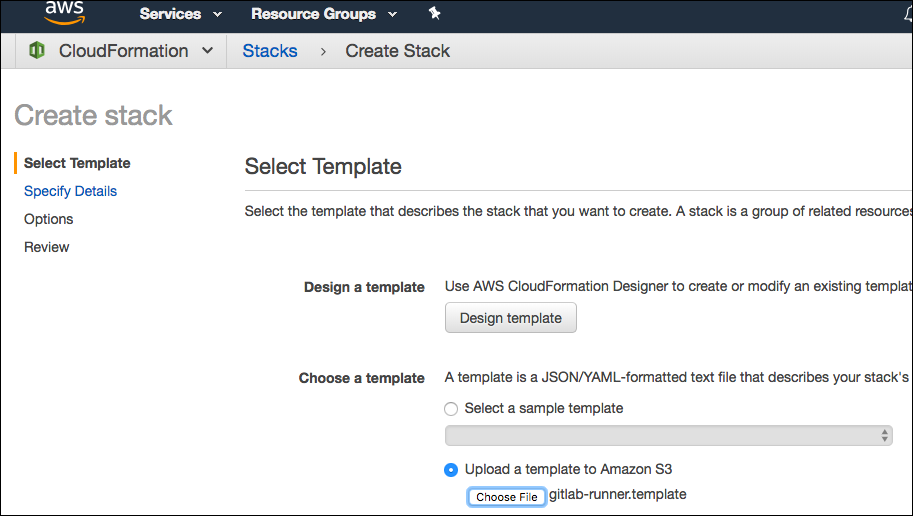
Log-in to the AWS console using your DevOps account, and navigate into CloudFormation (using Services --> CloudFormation).
Click "Create Stack".
Specify the template by uploading the gitlab-runner.template file. All the files you will need are located here.
Click "Next", and then enter each missing parameter:
- Stack name: the stack name, such as "GitLab-Runner"
- GitLabApiToken: For now, leave this blank. It's used for clean-up of the runner's registration, which will be discussed later.
- GitLabRunnerToken: The token for your GitLab project. Get this from the "Runners" section of your GitLab project's "Settings --> CI / CD --> Runners"
- KeyName: Select the Key Pair that you created earlier. If the drop-down is empty, then you need to create a key pair in the current region.
- Subnet1ID, Subnet2ID, Subnet3ID, and VpcId: Select the VPC that you'd like to use, as well as the subnet for each Availability Zone where the GitLab Runner can run. You'll want to use a private VPC for a real project, but for learning purposes you can use your account's Default VPC. The default VPC and its subnets will show up in the drop-downs (if you're using a new account); just select a different subnet for each selection. If the region you're using doesn't have at least 3 availability zones, then you'll need to tweak the template to remove the usage of Subnet3ID--otherwise, just switch to a region that has 3 AZs. If you use the same region in all three accounts, it will be less confusing but it's not required.
Click "Next" twice (to use the default options). Then, click the checkbox to allow IAM resource creation, and click "Create".
Wait a few minutes for the stack creation to complete. You can now view the EC2 instance of the GitLab Runner in the console (under Services --> EC2 --> Running Instances):

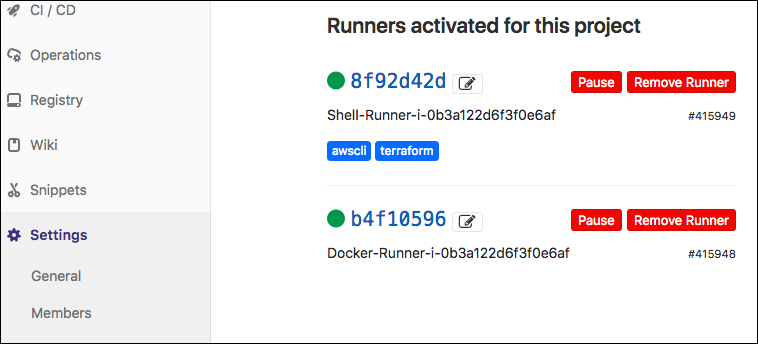
You can also see, in GitLab (under Settings --> CI/CD --> Runners), that there's a couple registered runners:
Next, select the stack in the CloudFormation console, and click the "Outputs" tab:
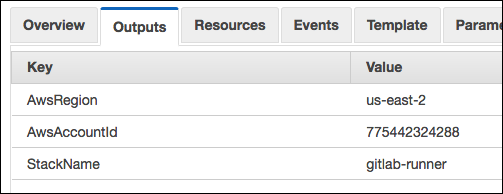
You'll need the Account ID from these outputs for the next section, when we set up the S3 backend, because we'll explicitly give the role in this account to access the other account's role.
Understanding the GitLab Runner Stack
At this point you have everything set up for running GitLab jobs that use Terraform. Let's take a look at what's in the stack:
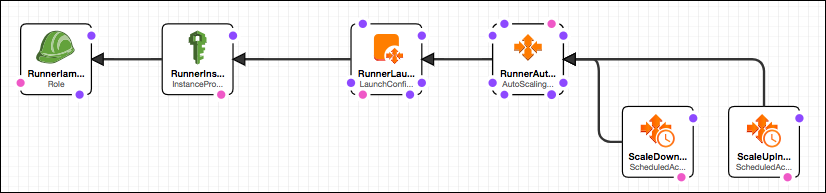
At the left of the above diagram, we have RunnerIamRole & RunnerInstanceProfile. These are for giving the EC2 instance (that runs the GitLab Runner) permission to assume the roles of the other accounts. The CloudFormation template for RunnerIamRole & RunnerInstanceProfile looks like:
  RunnerIamRole:
    Type: 'AWS::IAM::Role'
    Properties:
      RoleName: GitlabRunnerRole
      AssumeRolePolicyDocument:
        Version: 2012-10-17
        Statement:
          - Effect: Allow
            Principal:
              Service:
                - ec2.amazonaws.com
            Action:
              - 'sts:AssumeRole'
      Path: /
      Policies:
        - PolicyName: GitLabRunnerPolicy
          PolicyDocument:
            Version: 2012-10-17
            Statement:
              - Effect: Allow
                Action:
                  - 'sts:AssumeRole'
                Resource:
                  - 'arn:aws:iam::*:role/TerraformRole'
                  - 'arn:aws:iam::*:role/S3BackendRole'

  RunnerInstanceProfile:
    Type: 'AWS::IAM::InstanceProfile'
    Properties:
      InstanceProfileName: GitlabRunnerProfile
      Roles:
        - !Ref RunnerIamRole
The "AssumeRolePolicyDocument" (part of RunnerIamRole) allows the EC2 service to use RunnerIamRole when it starts instances, and the "GitLabRunnerPolicy" allows the instance to assume the roles of the other accounts (i.e., "Staging" and "Production"). It's limited to assuming only "TerraformRole" and "S3BackendRole" (which are roles defined in "s3-backend.template") to avoid giving the instance too much access (e.g., it cannot assume the administrative roles of the DevOps account).
After the IAM resources (RunnerIamRole & RunnerInstanceProfile), there's the resources for starting the EC2 instance: RunnerAutoScalingGroup & RunnerLaunchConfiguration. For these, the template code is a bit long, so you should review it directly in the file. Of particular importance are the commands labeled as "1-Register-Docker-Runner" and "2-Register-Shell-Runner". These commands each register a runner, associated with the specific GitLab project. Why two? Technically you only need one of them, so you can decide which you'd like to keep if you prefer not to use both. The difference is in which executor is used. The "docker" executor is better at isolating jobs from one another (since it runs in its own docker container), whereas the "shell" executor will have access to any installed tools. If you look at the "UserData" section of the "RunnerLaunchConfiguration", you'll see that we've installed docker, awscli, and terraform. This means that your GitLab Pipeline Jobs can use any of these when they use the shell executor. With the docker executor, you'd need an image that contains the tools. It's easy to create such an image, and it's a good idea, but it's an extra step. For now, we'll use the Shell Executor. We'll have to make sure our job (in the .gitlab-ci.yaml file) specifies a tag, either "terraform" or "awscli", in order for the runner to know to use the shell runner--otherwise it'll use docker. This is because the shell runner has the argument "--tag-list terraform,awscli" whereas the docker runner does not.
You may also have noticed that the "NotificationConfigurations" property uses a condition called "HasGitLabApiToken". Had you specified the GitLap API token in the CF stack parameters, it would include event notifications to the topic "RunnerLifecycleTopic". We'll get to this later in this article.
After the RunnerAutoScalingGroup & RunnerLaunchConfiguration, the template continues with AutoScaling scheduled actions that will remove it at night and re-create it in the morning (see the code snippet below). You can adjust the cron expressions if you prefer a schedule different than weekdays 9 AM to 5 PM CDT, or you can altogether remove these scheduled actions if you prefer to run 24x7.
  ScaleDownAtNight:
    Type: 'AWS::AutoScaling::ScheduledAction'
    Properties:
      AutoScalingGroupName: !Ref RunnerAutoScalingGroup
      DesiredCapacity: 0
      MaxSize: 0
      MinSize: 0
      Recurrence: 0 22 * * *
    Metadata:
      'AWS::CloudFormation::Designer':
        id: d16f00fe-10db-4d20-bc66-0664546b8f33
  ScaleUpInMorning:
    Type: 'AWS::AutoScaling::ScheduledAction'
    Properties:
      AutoScalingGroupName: !Ref RunnerAutoScalingGroup
      DesiredCapacity: 1
      MaxSize: 1
      MinSize: 1
      Recurrence: 0 14 * * 1-5
If you use the scheduled actions, please pay special attention to the next section, otherwise your GitLab project will accumulate a lot of obsolete runners (because they'll get freshly registered each morning but never unregistered).
Unregistration of the Runner
When you examine the "gitlab-runner.template" file, you'll notice a number of resources that contain the line "Condition: HasGitLabApiToken". Each of these is a component of the clean-up mechanism that will unregister the Runner (from GitLab) whenever the EC2 instance terminates. You can enable unregistration by:
-
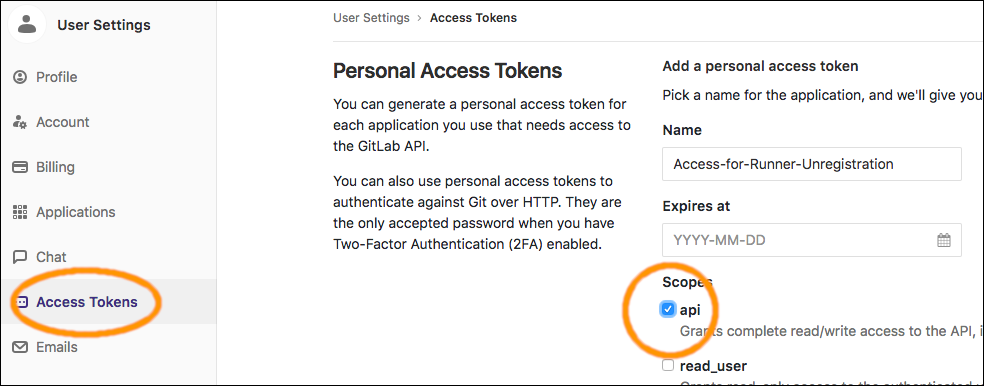
Log-in to GitLab, and create an API Token (User Settings --> Access Tokens), as depicted below:
-
Update the CloudFormation stack, without changing the template, but just change the value of the GitLabApiToken parameter:
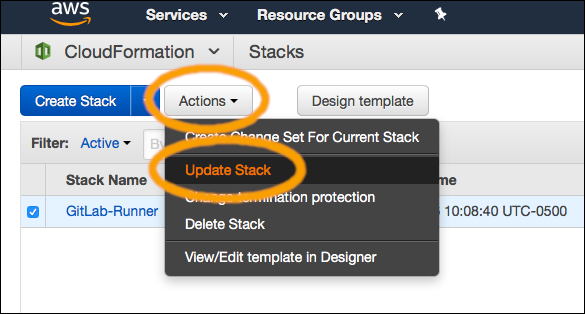
-
At the end of the wizard, before you click "Update", it should show the following preview of changes:
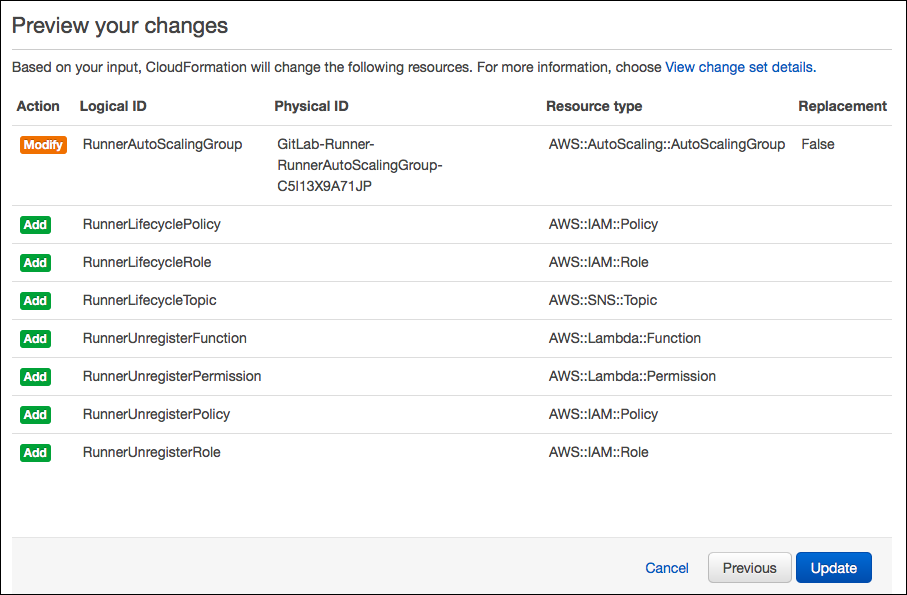
-
You can also choose to use KMS to improve security by encrypting the GitLab API token:
- Be aware this will cost $1 per month for the KMS keypair (current price as of time this article was written).
- Use KMS to create a customer-managed keypair
- Encrypt the GitLab API Access Token with it. An easy way to do this is to use the AWS Lambda Console's helper function:
- Navigate to the Lambda function
- Select the checkbox to enable the "helpers" (see screenshot below)
- You can find the documentation here under "Environment Variable Encryption".
- Select your KMS keypair
- Copy the encrypted token for use later to update the stack
- Click the "Code" button to get a JavaScript snippet
- Use the code snippet to tweak the Lambda function's code (in gitlab-runner.template) to decrypt the encrypted token prior to use
- Disable the "helpers"
- Set up IAM permissions so that only the Lambda function has permission to use the key for decryption
- Update the stack (again) to use the encrypted token
The reason for choosing to encrypt the GitLab API token is that anyone with access to the Lambda function will have access to the token, whereas if you encrypt it then they would also need decrypt permission (which can be limited per key).

The presence of GitLabApiToken will cause the stack to look at follows (notice the entire lower section of this diagram is for support of unregistering the runner):
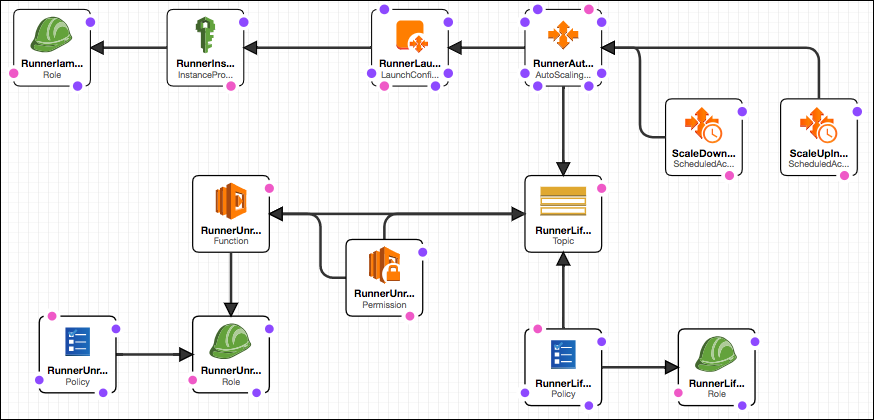
Here's how the unregistration works:
- The Autoscaling Group that controls the lifecycle of the EC2 instance will notify an SNS topic whenever an instance terminates.
- The SNS topic calls a Lambda function. The function makes an HTTPS request to GitLab (using the API token) to remove the runner registration.
- How does the Lambda function know which runner to unregister? It looks for the EC2 instance ID in the registration name. For this reason, it's important that the runner-registration commands (see the RunnerLaunchConfiguration) include the EC2 instance ID in the name of the runner:
gitlab-runner register --non-interactive --name Docker-Runner-$(ec2metadata --instance-id) ...
You might be wondering why I used the GitLab API to remove the runner, rather than execute a "gitlab-runner unregister" command--it's because I found that this command doesn't entirely remove the registration on the GitLab server (they still remain in the list of runners, albeit inactive). Also, it seems more reliable to use a lifecycle notification than a shutdown script within the instance because the instance might terminate suddenly. Nonetheless, I believe it could be done either way, each with pros/cons.
Deploy the S3 Backend
In another account, go to the CloudFormation console and create a stack from the s3-backend.template file.
Click "Next", and then enter the missing parameter values:
- Stack name: the name of the stack, such as "Terraform-Backend"
- ExternalId: any random value, such as a new GUID. This is an extra security measure, that AWS documentation explains. It's arguably not needed for our usage since we own all accounts involved, however using it doesn't hurt. You'll need to use the same value when running Terraform (in the S3 Backend configuration).
- GitlabRunnerAccountNumber: The account ID of the DevOps account, which you can get from the Outputs of the gitlab-runner CloudFormation stack.
Click "Next" twice (to use the default options). Then, click the checkbox to allow IAM resource creation, and click "Create".
Wait for the stack creation to complete. You now have everything set up for the S3 Backend.
If you want to set up both an example "Staging" account and an example "Production" account, then repeat the creation of the S3 Backend stack in your third account.
Understanding the S3 Backend Stack
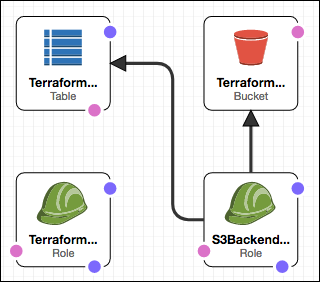
We set up the S3 Backend into the "Staging" account, and perhaps also into the "Production" account, by using the "s3-backend.template" file. If you examine this file, you'll see the following resources:
- TerraformStateBucket - The S3 bucket for holding Terraform State. Versioning is enabled, per Terraform's recommendation.
- TerraformLockTable - The DynamoDB table that's used as a locking mechanism.
- TerraformRole - Permissions needed for whatever resources the Terraform configuration will manage. For our example, it's just "ec2:*". However, for your project you would need to adjust this for whatever AWS services your project requires (e.g., VPN, RDS, SQS, etc...)
- S3BackendRole - Permissions needed for Terraform to access and update it's state stored in S3. This includes both access to the bucket and to the lock table.
These resources are depicted in the following CloudFormation stack diagram:
The permissions needed for the S3BackendRole come from Terraform's S3 Backend documentation.
Both roles (TerraformRole, and S3BackendRole) are locked-down so they can only be assumed by the role used by Terraform within the GitLab Runner. This is done within the AssumeRolePolicyDocument, by limiting the Principal to the ARN of the GitlabRunnerRole (of the DevOps account):
  TerraformRole:
    Type: 'AWS::IAM::Role'
    Properties:
      RoleName: TerraformRole
      AssumeRolePolicyDocument:
        Version: 2012-10-17
        Statement:
          - Effect: Allow
            Principal:
              AWS: !Join [ '', [ 'arn:aws:iam::', !Ref GitlabRunnerAccountNumber, ':role/GitlabRunnerRole' ] ]
            Action:
              - 'sts:AssumeRole'
            Condition:
              StringEquals:
                'sts:ExternalId': !Ref ExternalId
    etc...
Create the GitLab Configuration for Staging Deployment
Now that you have the GitLab Runner (with Terraform installed) and the S3 Backend(s), it's time to configure your GitLab Pipeline and add the Terraform configuration.
For this example, we'll just spin up an EC2 instance, but for your project it can be any AWS resources that Terraform supports and that your "TerraformRole" allows.
To set up the GitLab Pipeline, merely add (and commit) the ".gitlab-ci.yaml" file to your git repository. To start with, we'll create jobs for the "Staging" deployment:
cache:
  paths:
    - .terraform/plugins

stages:
  - plan
  - deploy

deploy_staging:
  stage: deploy
  tags:
    - terraform
  variables:
    TF_VAR_DEPLOY_INTO_ACCOUNT_ID: ${STAGING_ACCOUNT_ID}
    TF_VAR_ASSUME_ROLE_EXTERNAL_ID: ${STAGING_ASSUME_ROLE_EXTERNAL_ID}
    TF_VAR_AWS_REGION: ${STAGING_AWS_REGION}
  script:
    - terraform init -backend-config="bucket=${STAGING_TERRAFORM_S3_BUCKET}"
      -backend-config="region=${TF_VAR_AWS_REGION}" -backend-config="role_arn=arn:aws:iam::${TF_VAR_DEPLOY_INTO_ACCOUNT_ID}:role/S3BackendRole"
      -backend-config="external_id=${TF_VAR_ASSUME_ROLE_EXTERNAL_ID}"
      -backend-config="session_name=TerraformBackend" terraform-configuration
    - terraform apply -auto-approve -input=false terraform-configuration
  environment:
    name: staging
    url: https://staging.example.com
    on_stop: stop_staging
  only:
    variables:
      - $DEPLOY_TO == "staging"

stop_staging:
  stage: deploy
  tags:
    - terraform
  variables:
    TF_VAR_DEPLOY_INTO_ACCOUNT_ID: ${STAGING_ACCOUNT_ID}
    TF_VAR_ASSUME_ROLE_EXTERNAL_ID: ${STAGING_ASSUME_ROLE_EXTERNAL_ID}
    TF_VAR_AWS_REGION: ${STAGING_AWS_REGION}
  script:
    - terraform init -backend-config="bucket=${STAGING_TERRAFORM_S3_BUCKET}"
      -backend-config="region=${TF_VAR_AWS_REGION}" -backend-config="role_arn=arn:aws:iam::${TF_VAR_DEPLOY_INTO_ACCOUNT_ID}:role/S3BackendRole"
      -backend-config="external_id=${TF_VAR_ASSUME_ROLE_EXTERNAL_ID}"
      -backend-config="session_name=TerraformBackend" terraform-configuration
    - terraform destroy -input=false -auto-approve terraform-configuration
  when: manual
  environment:
    name: staging
    action: stop
  only:
    variables:
      - $DEPLOY_TO == "staging"
We start by declaring the "cache" section in order to cache the terraform plugins, so they only need to be installed for the first job execution.
Next, we declare a "plan" and "deploy" stage. These are the stages that jobs can belong to, listed in the order that they will execute. The names "plan" and "deploy" are arbitrary labels. Each job will declare the name of the stage that it executes within.
Next, we declare the first job, which is arbitrarily called "deploy_staging". This job will execute within the "deploy" stage, but will only execute when there exists a variable called "DEPLOY_TO" which has the value "staging". When it executes, it will create/update an environment (that's also called "staging"), and will run both a "terraform init" and "terraform apply" command. The assignment of variables that begin with "TF_VAR_" is so that they'll be made available to the Terraform configuration files, as documented here. The environment is associated with the "stop_staging" job, so that when the environment is stopped, it will execute "terraform destroy" (in order to clean up). The "terraform" tag is used to specify that we want to use the "Shell Runner" (and not our "Docker Runner") so that the Terraform binary will be available. Note: Our other option would be to use a Docker image that contains the Terraform binary.
The "terraform init" command makes sure the plugins are downloaded and the S3 Backend is configured. The "terraform apply" command actually performs create/update of any resources that are not in sync relative to the current state (based on data in the S3 bucket). Both commands specify "terraform-configuration" as the directory, so we'll need to create that subdirectory and use it for the "main.tf" file. Refer to these files in my github project and set them up similarly in yours.
Also in the ".gitlab-ci.yml" file are the jobs for deployment to "Production". However, let's move on to the "main.tf" file before looking at how the production deployment jobs work.
Terraform Configuration
Create the "terraform-configuration" directory and place a copy of "main.tf" into it.
Take a look at main.tf:
variable "DEPLOY_INTO_ACCOUNT_ID" {
    type = "string"
}

variable "ASSUME_ROLE_EXTERNAL_ID" {
    type = "string"
}

variable "AWS_REGION" {
    type = "string"
}

variable "region-ami-map" {
    type = "map"
    default = {
        "us-east-1" = "ami-cd0f5cb6"
        "us-east-2" = "ami-10547475"
        "us-west-1" = "ami-09d2fb69"
        "us-west-2" = "ami-6e1a0117"
        "ca-central-1" = "ami-9818a7fc"
        "eu-central-1" = "ami-1e339e71"
        "eu-west-1" = "ami-785db401"
        "eu-west-2" = "ami-996372fd"
        "ap-southeast-1" = "ami-6f198a0c"
        "ap-southeast-2" = "ami-e2021d81"
        "ap-northeast-1" = "ami-ea4eae8c"
        "ap-northeast-2" = "ami-d28a53bc"
        "ap-south-1" = "ami-099fe766"
        "sa-east-1" = "ami-10186f7c"
    }
}

provider "aws" {
  region     = "${var.AWS_REGION}"
  version    = "~> 1.26"
  assume_role {
    role_arn     = "arn:aws:iam::${var.DEPLOY_INTO_ACCOUNT_ID}:role/TerraformRole"
    session_name = "Terraform"
    external_id  = "${var.ASSUME_ROLE_EXTERNAL_ID}"
  }
}

terraform {
  backend "s3" {
    # Partial configuration is used since variables are not allowed here.
    key    = "terraform-state"
  }
}

resource "aws_instance" "ec2instance" {
  ami = "${lookup(var.region-ami-map, var.AWS_REGION)}"
  instance_type = "t2.micro"
}
Here we have declarations for the following:
- variables (including an AMI map, used for the EC2 instance)
- AWS provider configuration
- S3 backend configuration
- Lastly, the EC2 instance
The variables found in "main.tf" were initialized in ".gitlab-ci.yaml", using a set of variables that begin with either "STAGING_" or "PROODUCTION_". These "STAGING_" and "PRODUCTION_" variables will need to be specified. There are many options for doing this. Refer to Priority of Variables for a list of places where GitLab variables can be specified. I usually specify them in project settings ("Settings --> CI/CD --> Variables"), as depicted below:

Before your Staging pipeline will work successfully, you'll need to configure the variables as depicted, using the values:
- STAGING_ACCOUNT_ID - The ID of the AWS Account to deploy resources into. Refer to the Outputs of your s3-backend stack.
- STAGING_TERRAFORM_S3_BUCKET - The name of the S3 bucket. Refer to the Outputs of your s3-backend stack.
- STAGING_ASSUME_ROLE_EXTERNAL_ID - The External ID that you used for Assume Role.
- STAGING_AWS_REGION - The name of the AWS region (e.g., us-west-2). Refer to the Outputs of your s3-backend stack.
With these variables defined, the AWS provider (configured in main.tf) will be able to assume the TerraformRole so that it can create resources in the staging account. Also, the S3 Backend (configured via arguments to the "terraform init" command) will be able to assume the S3BackendRole, so that it can access the S3 bucket and the DynamoDB Lock table.
The EC2 instance (at the end of main.tf) is just an example of what you might deploy for your project. In a real project, however, you'll probably have more than just this single resource--so you should separate it into it's own file, separate from the provider and backend configuration. For example, you might have three files: vars.tf, provider.tf, and app.tf. Ultimately your structure of Terraform configuration files will depend on your project. If it's a large project, you could use Terraform Modules.
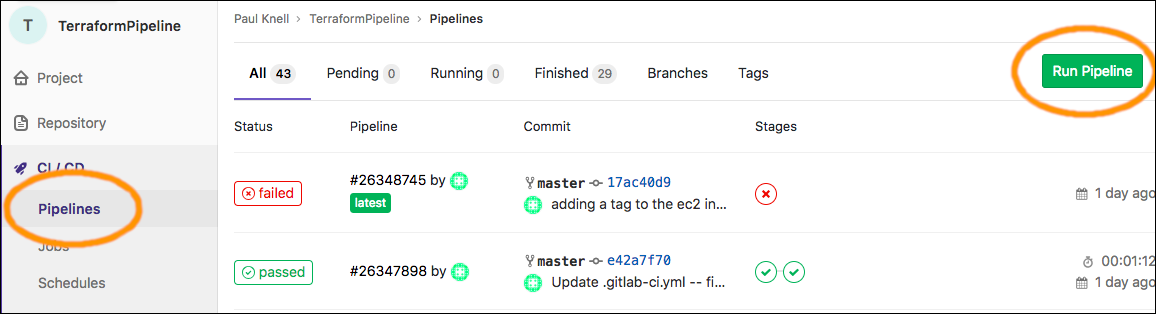
Run the Pipeline
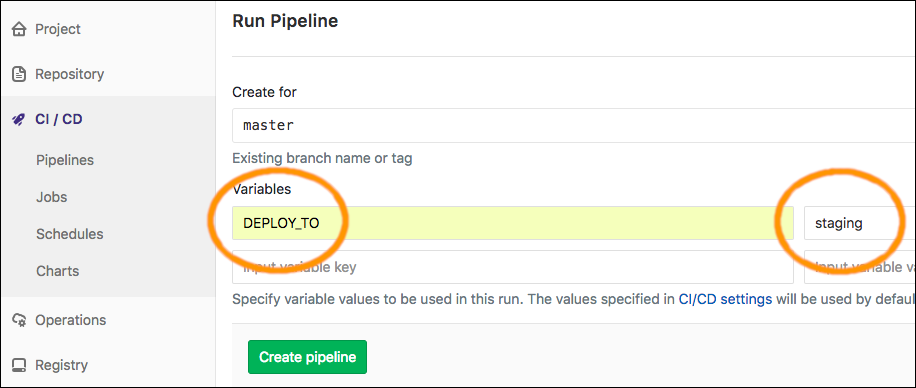
At this point, you're all set to run the pipeline for Staging Deployment. Because the job only runs when there's a DEPLOY_TO variable that equals "staging", you can specify this when creating the pipeline:
After your pipeline runs successfully, you should be able to see the EC2 instance that was deployed in the EC2 console (you might need to log-in with a user that has EC2 permissions):

If you want the deployment to happen automatically whenever code is comitted, you can set the DEPLOY_TO variable at the project level ("Settings --> CI/CD --> Variables").
You could also run the deployment on a schedule or create a trigger that will allow you to run it programmatically.
You can remove the EC2 instance (actually clean-up everything that Terraform has created in Staging) by stopping the environment:
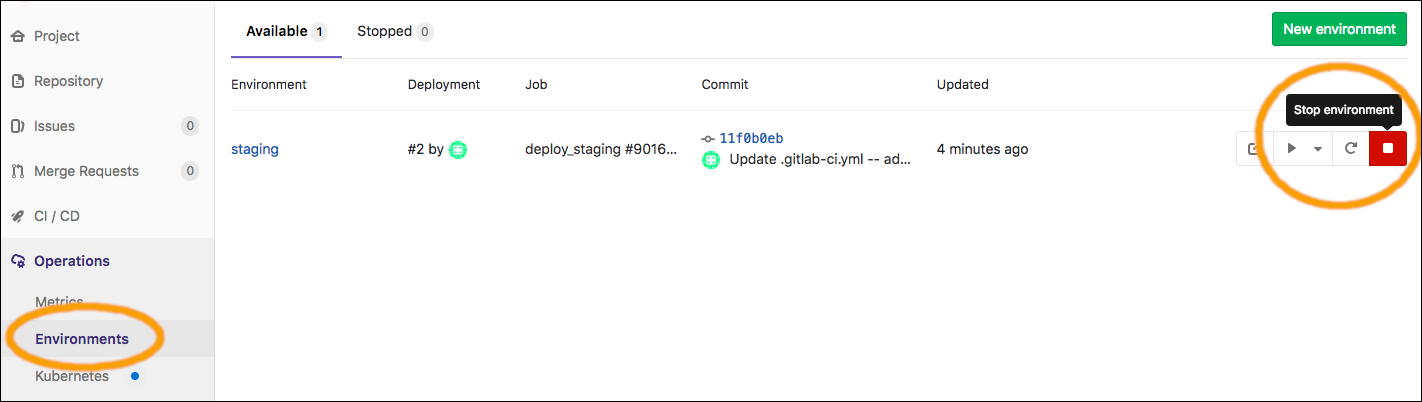
This will remove the environment (from the "Operations" --> "Environments" view within GitLab), and also initiates the "stop_staging" CI/CD pipeline job, which will run "terraform destroy" to clean-up the AWS resources (e.g., the EC2 instance).
Create the GitLab Configuration for Production Deployment
Add the production deployment jobs to your ".gitlab-ci.yml" file, if they're not already there:
plan_production:
  stage: plan
  tags:
    - terraform
  variables:
    TF_VAR_DEPLOY_INTO_ACCOUNT_ID: ${PRODUCTION_ACCOUNT_ID}
    TF_VAR_ASSUME_ROLE_EXTERNAL_ID: ${PRODUCTION_ASSUME_ROLE_EXTERNAL_ID}
    TF_VAR_AWS_REGION: ${PRODUCTION_AWS_REGION}
  artifacts:
    paths:
    - production_plan.txt
    - production_plan.bin
    expire_in: 1 week
  script:
    - terraform init -backend-config="bucket=${PRODUCTION_TERRAFORM_S3_BUCKET}"
      -backend-config="region=${TF_VAR_AWS_REGION}" -backend-config="role_arn=arn:aws:iam::${TF_VAR_DEPLOY_INTO_ACCOUNT_ID}:role/S3BackendRole"
      -backend-config="external_id=${TF_VAR_ASSUME_ROLE_EXTERNAL_ID}"
      -backend-config="session_name=TerraformBackend" terraform-configuration
    - terraform plan -input=false -out=production_plan.bin terraform-configuration
    - terraform plan -no-color production_plan.bin > production_plan.txt
  only:
    variables:
      - $DEPLOY_TO == "production"

deploy_production:
  stage: deploy
  when: manual
  tags:
    - terraform
  variables:
    TF_VAR_DEPLOY_INTO_ACCOUNT_ID: ${PRODUCTION_ACCOUNT_ID}
    TF_VAR_ASSUME_ROLE_EXTERNAL_ID: ${PRODUCTION_ASSUME_ROLE_EXTERNAL_ID}
    TF_VAR_AWS_REGION: ${PRODUCTION_AWS_REGION}
  script:
    - terraform init -backend-config="bucket=${PRODUCTION_TERRAFORM_S3_BUCKET}"
      -backend-config="region=${TF_VAR_AWS_REGION}" -backend-config="role_arn=arn:aws:iam::${TF_VAR_DEPLOY_INTO_ACCOUNT_ID}:role/S3BackendRole"
      -backend-config="external_id=${TF_VAR_ASSUME_ROLE_EXTERNAL_ID}"
      -backend-config="session_name=TerraformBackend" terraform-configuration
    - terraform apply -auto-approve -input=false production_plan.bin
  environment:
    name: production
    url: https://production.example.com
    on_stop: stop_production
  only:
    variables:
      - $DEPLOY_TO == "production"

stop_production:
  stage: deploy
  tags:
    - terraform
  variables:
    TF_VAR_DEPLOY_INTO_ACCOUNT_ID: ${PRODUCTION_ACCOUNT_ID}
    TF_VAR_ASSUME_ROLE_EXTERNAL_ID: ${PRODUCTION_ASSUME_ROLE_EXTERNAL_ID}
    TF_VAR_AWS_REGION: ${PRODUCTION_AWS_REGION}
  script:
    - terraform init -backend-config="bucket=${PRODUCTION_TERRAFORM_S3_BUCKET}"
      -backend-config="region=${TF_VAR_AWS_REGION}" -backend-config="role_arn=arn:aws:iam::${TF_VAR_DEPLOY_INTO_ACCOUNT_ID}:role/S3BackendRole"
      -backend-config="external_id=${TF_VAR_ASSUME_ROLE_EXTERNAL_ID}"
      -backend-config="session_name=TerraformBackend" terraform-configuration
    - terraform destroy -input=false -auto-approve terraform-configuration
  when: manual
  environment:
    name: production
    action: stop
  only:
    variables:
      - $DEPLOY_TO == "production"
These jobs are similar to those of the "Staging" deployment, except that there's an extra job because we've set up a manual review step. The "plan_production" runs in the "plan" stage (prior to the "deploy" stage) in order to create an artifact called production_plan.bin (and production_plan.txt). The "deploy_production" job only runs when manually triggered, and it runs "terraform apply" using the "production_plan.bin" file--so it applies the plan. In this way, an operator can view production_plan.txt in order to review a detailed description of all the changes that will be performed prior to them being applied (i.e., prior to manual initiation of "deploy_production"). This is a simple example implementation of an approval workflow that leverages GitLab's "artifacts" feature and Terraform's "plan" feature.
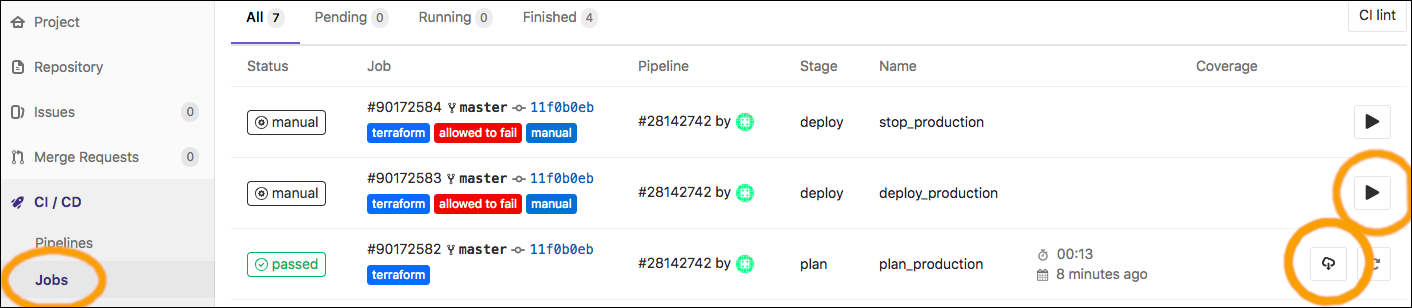
When you create a pipeline with the "DEPLOY_TO" variable set to "production", the "plan_production" job will run. It will create an artifact that you can download to review the changes. The "deploy_production" job can then be initiated to apply the plan. The controls for doing this are depicted below.
Conclusion
When you're done, remember to stop your environments (so you do not incur costs by leaving EC2 instances running), and delete your CloudFormation Stacks unless you intend to continue using them.
Congratulations! You've made it to the end of this article! As you can see from the process that you've just worked through, there is a lot involved with setting up automated infrastructure deployment into multiple AWS accounts using GitLab and Terraform. However, once this is set up for your project, you will have a controlled deployment process that will ensure consistency between environments and reduce the potential for human error that typically exists in a manual process. Since Terraform's API is so complete, you can configure your entire AWS environment with ".tf" files that are checked-in with your source code, and managing deployments into several environments becomes trivial.