- Tags
- Article
- DevOps
- CI/CD
- container applications
- elastic
Launch an Application with AWS Elastic Kubernetes Service
Getting into Containerized Applications
After launching the ECS Application, I wanted to know more about the other container orchestration systems available and how they compare to ECS. Of the options available for container orchestration, Kubernetes (K8s) is the standard bearer. Therefore, it seemed obvious to launch the sample application in some form of K8s.
What is Elastic Kubernetes Service
Elastic Kubernetes Service (EKS) is AWS's managed Kubernetes offering. This means AWS exposes the the Kubernetes control API to you as a service so you can use it to control the cluster that you define. There was a lot of vocabulary there, so lets provide a few K8s definitions.
-
Node - A computer under control of K8s running the services necessary to run pods.
-
Control Plane - The computer or computers which accept configurations through the K8s API and distribute workload to Nodes in the cluster.
-
Cluster - A group of nodes under control of K8s and the computers running the control plane
-
Pod - A grouping of one or more container instances running on a node. A node may run multiple pods.
-
Deployment - A configuration describing the container images and the number of copies the user would like to run on the cluster. A cluster may run multiple deployments.
-
Service - Provides a network access point within the cluster for pods launched by a single deployment. Allows for communication between pods belonging to different deployments.
-
Ingress - Defines a network traffic route from outside the K8s cluster to a desired service.
The post details how I configured my K8s cluster to run the sample microservice based application. Beyond the hourly rate to use EKS, another difference you'll notice is that configuring the application using K8s requires more base knowledge and attention to detail than ECS. However, I hope this post will help you overcome this initial learning curve so that you can experience some of the advantages of using EKS over ECS. Those advantages include:
-
Portability between cloud service providers
-
A larger pool of IT professionals available to administer your app.
-
More expressive API leads to more configurable cluster
-
Reproduce and track changes to your cluster when managed using manifest files in source control
Getting Started
Additional AWS Environment Setup VPC Considerations
Pay attention to the VPC and subnets created by our cloud formation script. Tags are required for EKS to find and place resources.
The VPC is tagged with the KV pair kubernetes.io/cluster/<cluster-name> : shared
Similarly the public subnets are tagged with the KV pairs kubernetes.io/cluster/<cluster-name> : shared which registers this VPC to the cluster and kubernetes.io/role/elb : 1 which marks this subnet eligible to host public ALB target groups

The private subnets are tagged with the KV pairs kubernetes.io/cluster/web-app : shared and kubernetes.io/role/internal-elb : 1 which marks the subnet eligible to host private ALB target groups.

Permissions
Our cluster requires permissions to create AWS resources external to the cluster. In this example our ingress controller will create an Application Load Balancer. Your application may require access to S3 or RDS and the permission set up would be similar.
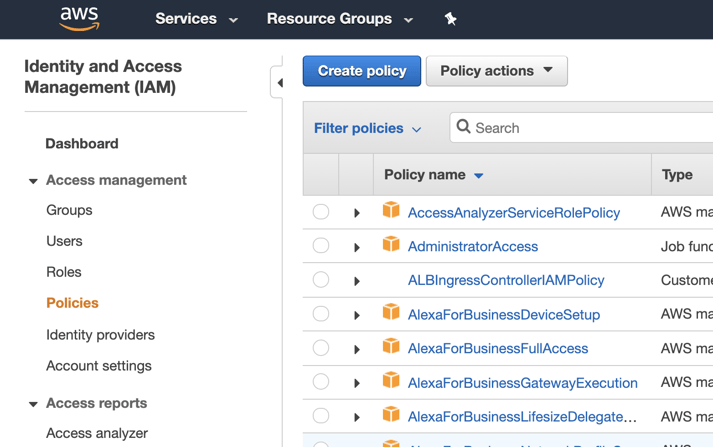
First we will create an IAM policy. In the AWS console open IAM and select Policies from the left menu pane. Click Create Policy.
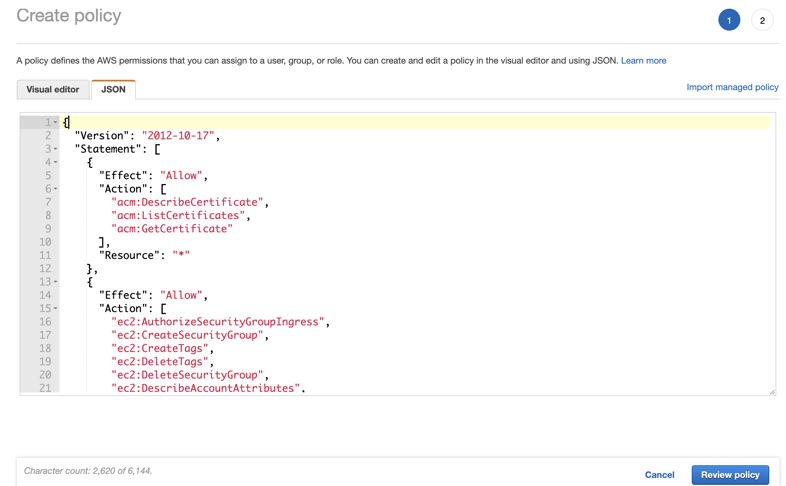
Copy the policy from AWS Ingress Controller Policy into the the JSON tab and select review policy.
Name your policy and click "Create Policy"
Find your policy in the list and select it. The policy has a unique identifier called an ARN. Copy this ARN and use it for setting up your cluster in a later step.
Create the Cluster
Our last step before moving on to the K8s portion of the setup is to create the cluster in AWSA. The configuration files for the cluster and the K8s objects are located in the git repository in the folder marked aws-eks. Inside this folder you will find cluster.yaml which provides instructions to eksctl to configure and start the cluster in AWS.
Let's review the document:
apiVersion: eksctl.io/v1alpha5
kind: ClusterConfig
metadata:
name: web-app
region: us-east-2
iam:
withOIDC: true
serviceAccounts:
- metadata:
name: alb-ingress-controller
namespace: kube-system
attachPolicyARNs:
- "<your policy ARN>"
vpc:
id: <vpc-id>
subnets:
private:
us-east-2a: { id: <private subnet 1> }
us-east-2b: { id: <private subnet 2> }
public:
us-east-2a: { id: <public subnet 1> }
us-east-2b: { id: <public subnet 2> }
fargateProfiles:
- name: system
selectors:
- namespace: default
- namespace: kube-system
- name: local
selectors:- namespace: local
Metadata names our cluster and determines the region in which we would like our resources to be located. IAM creates a K8s object called a Service Account within the cluster and associates it with the IAM role we created in the previous step. VPC registers your VPC with the cluster, and also adds the tags to the resources listed. This is a critical step when using Fargate, because Fargate instances do not have access to instance metadata like EC2 instances do.
Create the cluster in the terminal using eksctl create cluster -f cluster.yaml
See the documentation for eksctl
Special Considerations for Fargate
I've set this demo up using Fargate, AWS's serverless compute product for containers. There are a couple of advantages to using Fargate: AWS will keep the operating system below the container up to date and the number of service replicas will not be bound by the number of available EC2 instances.
The transition to serverless is a change in the standard K8s model. Standard K8s manages a finite amount of compute resources and attempts to schedule pods onto those resources based on the parameters provided in the deployment using a bin-packing algorithm. When you use Fargate, the responsibility for bin-packing your workload is offloaded to AWS.
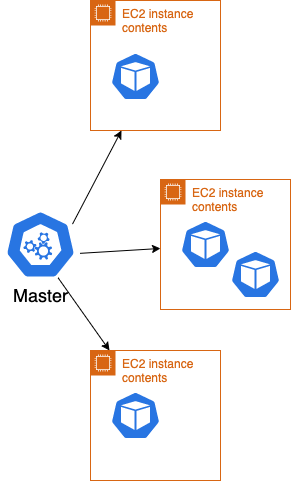
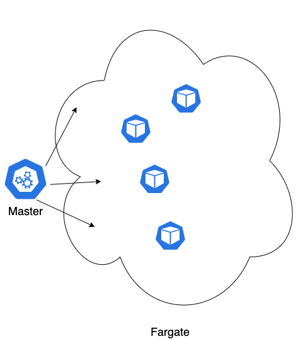
Amazon configures your cluster to handle this situation by creating a Fargate profile. Specifying the system namespaces in a fargate profile instructs the control plane to launch the standard K8s services in Fargate as well, creating an entirely serverless cluster.
Launching your App in Kubernetes
After 10 minutes or so your EKS cluster will be up and ready to deploy our application. Our application deployment will consists of 6 K8s objects:
- Deployments
- Ingress Controller
- Frontend
- Backend
- Services
- Frontend
- Backend
- Ingress
- Frontend
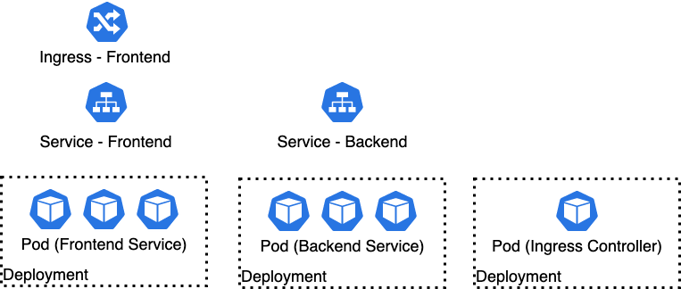
We'll walk you through the deployment of the ingress controller and the frontend here. We also provide the configuration for the backend in the git repository, but leave you to try your own set up as an exercise.
Permissions for the Ingress Controller
K8s' security uses Role Based Access Control to define which accounts have what permissions in the cluster. Actions allowed are defined by Roles, like the ClusterRole object below. Who or what is allowed to act is defined by the ServiceAccount. Binding a service account to a role gives that service account the permissions described in the role. Below are the contents of rbac-role.yaml.
apiVersion: rbac.authorization.k8s.io/v1
kind: ClusterRole
metadata:
  labels:
    app.kubernetes.io/name: alb-ingress-controller
  name: alb-ingress-controller
rules:
  - apiGroups:
      - ""
      - extensions
    resources:
      - configmaps
      - endpoints
      - events
      - ingresses
      - ingresses/status
      - services
    verbs:
      - create
      - get
      - list
      - update
      - watch
      - patch
  - apiGroups:
      - ""
      - extensions
    resources:
      - nodes
      - pods
      - secrets
      - services
      - namespaces
    verbs:
      - get
      - list
      - watch
---
apiVersion: rbac.authorization.k8s.io/v1
kind: ClusterRoleBinding
metadata:
  labels:
    app.kubernetes.io/name: alb-ingress-controller
  name: alb-ingress-controller
roleRef:
  apiGroup: rbac.authorization.k8s.io
  kind: ClusterRole
  name: alb-ingress-controller
subjects:
  - kind: ServiceAccount
    name: alb-ingress-controller
    namespace: kube-system
---
apiVersion: v1
kind: ServiceAccount
metadata:
  labels:
    app.kubernetes.io/name: alb-ingress-controller
  annotations:
    eks.amazonaws.com/role-arn: <your cluster's role arn>
  name: alb-ingress-controller
  namespace: kube-system
Here we create a role, service account, and binding. When we specify the kubernetes service account we provide a mapping to the IAM role we created for the service account when we created our cluster. To retrieve this role ARN for the alb-ingress-controller use the command:
eksctl get iamserviceaccount --cluster web-app --name alb-ingress-controller --namespace kube-system
Paste the ARN into <your cluster's role arn>
Apply your configuration in K8s with kubectl apply -f rbac-role.yaml
Deploy the Ingress Controller
This is an evolving AWS project, in our experience we've found that bugs are eliminated by using the most up-to-date version of the ALB-Ingress-Controller. Let's take a look at its configuration file.
# Application Load Balancer (ALB) Ingress Controller Deployment Manifest.
# This manifest details sensible defaults for deploying an ALB Ingress Controller.
# GitHub: https://github.com/kubernetes-sigs/aws-alb-ingress-controller
apiVersion: apps/v1
kind: Deployment
metadata:
  labels:
    app.kubernetes.io/name: alb-ingress-controller
  name: alb-ingress-controller
  # Namespace the ALB Ingress Controller should run in. Does not impact which
  # namespaces it's able to resolve ingress resource for. For limiting ingress
  # namespace scope, see --watch-namespace.
  namespace: kube-system
spec:
  selector:
    matchLabels:
      app.kubernetes.io/name: alb-ingress-controller
  template:
    metadata:
      labels:
        app.kubernetes.io/name: alb-ingress-controller
    spec:
      containers:
        - name: alb-ingress-controller
          args:
            # Limit the namespace where this ALB Ingress Controller deployment will
            # resolve ingress resources. If left commented, all namespaces are used.
            # - --watch-namespace=your-k8s-namespace

            # Setting the ingress-class flag below ensures that only ingress resources with the
            # annotation kubernetes.io/ingress.class: "alb" are respected by the controller. You may
            # choose any class you'd like for this controller to respect.
            - --ingress-class=alb

            # REQUIRED
            # Name of your cluster. Used when naming resources created
            # by the ALB Ingress Controller, providing distinction between
            # clusters.
            - --cluster-name=web-app

            # AWS VPC ID this ingress controller will use to create AWS resources.
            # If unspecified, it will be discovered from ec2metadata.
            - --aws-vpc-id=vpc-0e4404bd3d65d5229

            # AWS region this ingress controller will operate in.
            # If unspecified, it will be discovered from ec2metadata.
            # List of regions:       http://docs.aws.amazon.com/general/latest/gr/rande.html#vpc_region
            - --aws-region=us-east-2

            # Enables logging on all outbound requests sent to the AWS API.
            # If logging is desired, set to true.
            # - --aws-api-debug
            # Maximum number of times to retry the aws calls.
            # defaults to 10.
            # - --aws-max-retries=10
          # env:
            # AWS key id for authenticating with the AWS API.
            # This is only here for examples. It's recommended you instead use
            # a project like kube2iam for granting access.
            #- name: AWS_ACCESS_KEY_ID
            #  value: KEYVALUE

            # AWS key secret for authenticating with the AWS API.
            # This is only here for examples. It's recommended you instead use
            # a project like kube2iam for granting access.
            #- name: AWS_SECRET_ACCESS_KEY
            #  value: SECRETVALUE
          # Repository location of the ALB Ingress Controller.
          image: docker.io/amazon/aws-alb-ingress-controller:latest
          imagePullPolicy: IfNotPresent
      serviceAccountName: alb-ingress-controller
Here we are creating a deployment which consists of one container named alb-ingress-controller. We need to specify the ingress class as alb to get an application load balancer. The cluster name is, of course, the cluster we intend to deploy to. Since we are working with Fargate, which cannot access EC2 metadata, we need to set our vpc id and region. Check that the container image is the latest, and ensure the service account name matches the one you created in the previous steps.
kubectl apply -f alb-ingress-controller.yml
There is a lot of manual mapping of roles, permissions, and service accounts for this section. Its possible you missed a step. Lets confirm that our ingress controller is up and running.
Get the pod name for the ingress controller using
kubectl get pods -A
… which lists all pods in -A all namespaces. Check the logs for this pod by calling
kubectl logs alb-ingress-controller-<serialnumber> -n kube-system
If the logs are free of errors, we should be up and running!
Deploy the Front End Microservice
We will deploy our service into a namespace called local. The reason for this is the frontend service calls the backend service by the url http://backend.local:8080/. Service discovery within K8s will affix the namespace behind the service name. As long as we name the service backend and deploy it into the local namespace. Although we attached the namespace "local" to a Fargate Profile, we haven't created the namespace local within the K8s cluster yet. We can do that with the command:
kubectl create namespace local
To start up the front end microservice we will need to create a deployment, a service, and an ingress. Lets start with the deployment - frontend.yml
apiVersion: apps/v1
kind: Deployment
metadata:
  labels:
    app: frontend
  name: frontend
  namespace: local
spec:
  replicas: 2
  selector:
    matchLabels:
      app: frontend
  template:
    metadata:
      labels:
        app: frontend
    spec:
      containers:
      - image: <your repo base url>/frontend-service
        imagePullPolicy: Always
        name: frontend
We see that we are creating a deployment where we specify the containers that will be run inside the pods, and the number of replicas of those pods. The image will be the frontend service created by the startup script in "Sample Application." Of special interest here is the labels. Notice how we use the label "app: backend." This will be important as we set up our service.
kubectl apply -f frontend.yml
Now lets check that the deployment was successful. Running
kubectl get po -n local -o wide
Provides us with all the pods running in the local namespace. You should have two backend pods running and they should be in different availability zones as signified by the IP address.
At this point we could login to one of the pods and make calls to its api via its internal IP address. You would do that using this command to launch a shell within the pod.
kubectl exec -it -n local frontend-84649f9f8f-gdlc9 sh
And then using the wget command to call the ip address of the pod. However, pods are ephemeral, so it doesn't make sense to configure pod to pod communication using these IP addresses because they will change as the number of replicas are scaled up and down or updated.
A service provides an abstraction above the pod level to direct network traffic to the appropriate pods. Check out frontend-service.yml
apiVersion: v1
kind: Service
metadata:
  name: frontend
  namespace: local
spec:
  type: NodePort
  selector:
    app: frontend
  ports:
    - protocol: TCP
      port: 8080
      targetPort: 8080
This is a straightforward service object. The service is deployed with the name frontend into the local namespace. Internal to the cluster it will be accessible as frontend.local. K8s has options for service type including ClusterIp, NodePort, and LoadBalancer. We've selected NodePort because it is compatible with the alb-ingress-controller we've already deployed. Its important to note that the selector field label matches the label the provided on the deployment and container. This label is how the Service will link itself to the running pods.
Start the service with
kubectl apply -f frontend.yml
You can verify the service is running with
kubectl get svc -n local
And also check that it is connected to the pods with
kubectl get ep -n local
… which should list the IP addresses of your backend pods as endpoints.
This is great, however we still have no route to the internet! Our frontend service is deployed into a private subnet and the IP attached to the service is within the cluster. To solve this problem we define an ingress. Check out frontend-ingress.yml.
apiVersion: extensions/v1beta1
kind: Ingress
metadata:
  name: "frontend-ingress"
  namespace: "local"
  annotations:
    kubernetes.io/ingress.class: alb
    alb.ingress.kubernetes.io/scheme: internet-facing
    alb.ingress.kubernetes.io/target-type: ip
    alb.ingress.kubernetes.io/healthcheck-path: /health
spec:
  rules:
  - http:
      paths:
      - path: /*
        backend:
          serviceName: "frontend"
          servicePort: 8080
There's some important stuff going on here under annotations. The first three annotations are required for exposing fargate services to the internet. The fourth is the specific API endpoint our program uses to signal that it is healthy to the ALB. All traffic to this load balancer will be routed to this service, however other patterns are possible. Let's fire it up!
kubectl apply -f frontend-ingress.yml
Cross your fingers! If you did it all correctly you should now see a public DNS address for a load balancer when you run:
NAMESPACE   NAME               HOSTS   ADDRESS                                                                 PORTS   AGE
local       frontend-ingress   *       6b1f5521-local-frontending-928f-326211360.us-east-2.elb.amazonaws.com   80      5s
Take that web address and hit it from your desktop. There's no backend service yet, so hit the health endpoint of our API and verify that it comes back true.
curl http://<load-balancer-name>/health
… should return true.
Deploy the Backend Microservice
To do this, use kubectl to apply the backend deployment: backend.yaml and the backend service: backend-service.yaml. As an exercise you could try to create your own manifest and reference back to the repo as a check.
You can access instructions on github.


